Deactivating a sub-calendar hides it from all users without deleting it. You can reactivate it anytime if needed. Deleting a sub-calendar is permanent; deleting will remove the sub-calendar and all its data.
Access level required: Administrator
Deactivate a sub-calendar
- Open Teamup in a browser.
- Click the Add / Edit link below the Calendars list.
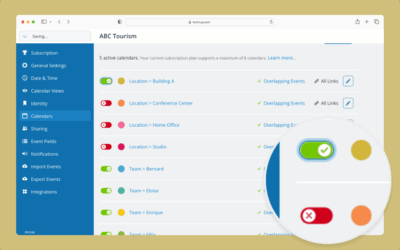
- All calendars (both active and inactive) are listed in the Calendars tab of Settings.
- Locate the calendar you want to deactivate in the Calendars tab.
- Click the toggle next to the calendar.
- When the toggle is set to red/X, the calendar is deactivated.
- Deactivated calendars do not count toward your plan’s sub-calendar limit.
- To reactivate a calendar, click the toggle back to green/√.
Delete a sub-calendar
⚠️ Deleting a calendar will remove the calendar with all its event and data permanently. Deleting cannot be undone.
- Open Teamup in a browser.
- Click the Add / Edit link below the Calendars list.
- Click the pencil icon next to the sub-calendar you want to delete.
- On the Edit Calendar screen, click Delete to permanently delete this sub-calendar and all its data.
- Click Delete Calendar Forever to confirm your choice and permanently remove the sub-calendar.
- The deleted calendar will no longer be available in the Calendars list.
ℹ️ Learn more