Need more from Teamup? Upgrade your calendar’s subscription plan.
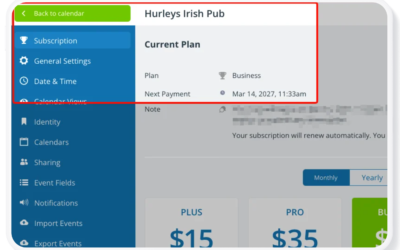
Access level required: Administrator
- Open the calendar in a browser (settings are not available in the Teamup app).
- Click the blue menu in the top right.
- Select Settings.
- The Subscription tab shows your current plan information at the top.
- If you have not added payment information, scroll down and click the blue Billing details button.
- Enter the billing contact information and payment details. Then click Save.
- Click the Monthly or Yearly tab to set the billing cycle. See more details.
- Click the green Select button on the plan you want for this calendar. See a comparison of all plans.
- During a free trial, if you would like to end the trial and activate the subscription immediately, add the billing details including a payment method. Once the billing details are saved, the trial will end, the new subscription will start and you will be charged immediately. To continue with the free trial, do not enter billing details.
- To try a different plan during the trial period without initiating a subscription, do NOT enter payment details. Select the plan you want without entering payment details and the trial will adjust to that selected plan.
- When upgrading from the Basic (free) plan, click Reactivate Subscription after selecting a plan. You will be charged and the upgrade will be applied to your calendar immediately.
- When upgrading from a paid plan, a pop-up will show a preview of the price difference for the upgrade. Confirm the upgrade. Once confirmed, you will be charged for the difference in price. the upgrade will be applied to your calendar immediately.
ℹ️ Learn more